How to Increase Sensitivity of Mouse in Windows 10
The mouse is a key peripheral that is used for input since the rise of computers. But a lot of users have been unhappy by the default mouse speed on Windows 10. Since preferences vary a lot from person to person, some users feel that their cursor is moving to fast while others feel that the default speed could be faster. Sure, some high-end external mouses have their proprietary software capable of adjusting the mouse sensitivity, but there are a few native ways that will enable you to do it from Windows 10.
Windows 10 is equipped to let you customize your mouse sensitivity in a variety of ways. Besides changing the mouse speed and its related settings, you can also adjust the number of lines that will be scrolled with each mouse wheel movement.
If you are not satisfied with the sensitivity of your mouse in Windows 10, we have prepared a collection of methods that will enable you to customize the mouse speed to your personal preference. Please follow whichever method seems more approachable in your particular situation. If you find that one method is not applicable, simply move down to the next one until you manage to resolve the issue.
Method 1: Change the Mouse Sensitivity via the DPI Button
If you want to avoid doing any tweaking inside the Windows menus or the registry editor, your best choice is to use the DPI button located on your mouse. Although not are mouses will have one, most peripherals of this type will include a DPI button that will allow you to switch to different sensitivity settings.

However, keep in mind that most DPI changes from the mouse menu are temporary and will be overwritten whenever you turn off your PC or you disconnect your mouse (or take out its battery).
If you're looking for a method that will bring a more permanent change, continue to the other methods below.
Method 2: Changing the mouse sensitivity from Control Panel
The native way to modify the default mouse sensitivity values is via Control Panel. This is the most intuitive approach and it will enable you to modify the pointer speed, the speed of double-clicking and even allow you to switch the primary button with the second one if you're into that kind of stuff.
Here's a quick guide on how you can modify the mouse sensitivity on Windows 10 via Control Panel:
- Press Windows key + R to open up a Run box. Then, type "control" and hit Enter to open Control Panel.

Open Control Panel - Inside Control Panel, click on Hardware and Sound, then click on Mouse (under Devices and Printers.
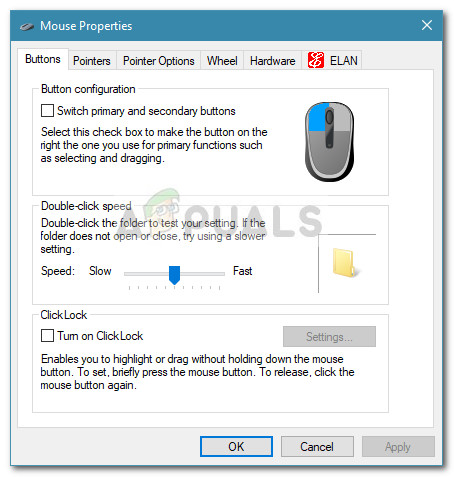
- In Mouse Properties, you can select the Buttons tab to change the button configuration and increase or decrease the double-click speed.

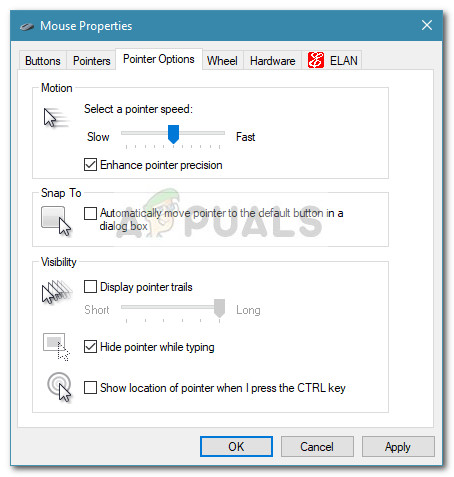
Mouse Properties - If you want to adjust the sensitivity, select the Pointer Options tab and use the slider under Motion to adjust how fast your mouse pointer is. You can also check the box associated with Enhance pointer precision to make it more snappy.

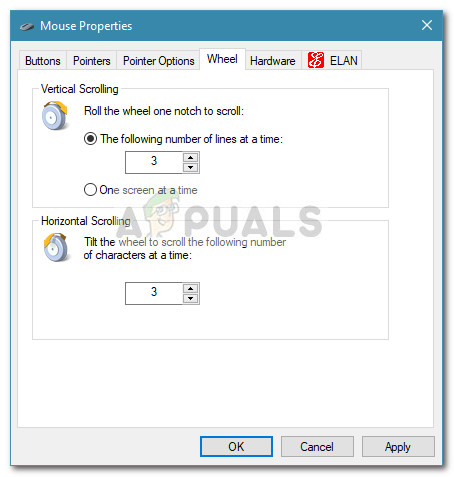
Adjust Pointer Options - If you want to reduce or boost the number of lines that get scrolled at a time, go over to the Wheel tab and use the drop-down menu under Vertical Scrolling.

Adjust Vertical Scrolling If this method wasn't effective or you're looking for a more technical approach, move over to the other method below.
Method 3: Changing the mouse sensitivity via Registry Editor
A more technical way of modifying the mouse sensitivity settings is via Registry Editor. This will require you to get a little technical and is potentially dangerous, but if you follow the instructions correctly you won't run any risk of damaging your registry files.
This method will allow you to make some correlated registry changes in the speed settings to increase your mouse sensitivity to maximum. Keep in mind that raising the value beyond the ones specified below might end up slowing your mouse rather than making it faster.
Here's a quick guide on using Registry Editor to modify the mouse sensitivity settings:
- Press Windows key + R to open up a new Run box. Then, type "Regedit", hit Enter and click on Yes at the UAC (User Account Control) prompt to open Registry Editor with administrative privileges.

Open Regedit - Inside Registry Editor, go to the ribbon at the top and choose File > Export, then select an appropriate location in which to save the registry backup. This step is done to ensure that we have the means to restore the registry to its previous state in case something goes wrong.

Export File Note: In the unfortunate event that your registry does get damaged during this process, go to File > Import and choose the backup that you previously created to restore to a healthy state.
- Using the left pane of Registry Editor, navigate to the following location:
Computer \ HKEY_CURRENT_USER \ Control Panel \ Mouse
- Move over to the right pane and double-click on MouseSpeed and set it's Value data to 2and click Ok to save the changes.

Change MouseSpeed Registry Value to 2 - Next, double-click on MouseThreshold1 and set it's Value data to 0 and hit OK to save.

Set Registry Value of MouseThreshold1 to Zero - Finally, double-click on MouseThreshold2 and set it's Value data to 0 and hit OK to save the changes.
- After completing the steps above, your mouse sensitivity is set to the maximum. Close Registry Editor and reboot your computer to force the changes to take effect.
![]()
Kevin is a dynamic and self-motivated information technology professional, with a Thorough knowledge of all facets pertaining to network infrastructure design, implementation and administration. Superior record of delivering simultaneous large-scale mission critical projects on time and under budget.
How to Increase Sensitivity of Mouse in Windows 10
Source: https://appuals.com/how-to-change-mouse-sensitivity-on-windows-10/